Paper mache heart
Paper Mache Heart: Craft a Charming Decorative Heart with Recycled Paper
Create a delightful paper mache heart using recycled paper and a few simple materials. This eco-friendly project is perfect for adding a personal touch to your home décor or for crafting a thoughtful, handmade gift. Follow these steps to make your very own paper mache heart!
Materials You’ll Need:
- Old newspapers or scrap paper
- Cardboard (for the heart base)
- Flour or white glue (for the paper mache paste)
- Water
- Paint (optional for decoration)
- Paintbrushes
- Bowl or container (for the paste)
- Scissors
- String or ribbon (optional for hanging)
- Plastic sheet or old newspaper (to protect your workspace)
Step-by-Step Guide:
Step 1: Create the Heart Base
Start by cutting out two heart shapes from a piece of cardboard. The size of the hearts depends on your preference, but make sure both are identical. These pieces will serve as the frame for your paper mache heart.
Step 2: Prepare the Paper Mache Paste
You can make a simple paper mache paste using flour and water or use white glue. To make the paste:
- Flour paste: Mix one part flour with one part water in a bowl, stirring until it reaches a smooth, glue-like consistency. Add a little more water if it’s too thick.
- Glue paste: Mix white glue with water (two parts glue to one part water) for a smoother finish.


Step 3: Build the Heart Structure
To give your heart some depth, create small rolled or crumpled pieces of newspaper and place them between the two cardboard hearts, layering them to form a 3D structure. Use tape or a little glue to hold the layers together temporarily.


Step 4: Apply the Paper Mache Layers
Tear old newspaper or scrap paper into small strips. Dip each strip into the paper mache paste, making sure to remove any excess paste by running the strip between your fingers. Then, start covering the cardboard heart frame with the strips, overlapping them to create a smooth surface. Continue applying strips until the entire heart is covered.
Step 5: Build Up Layers
For a sturdy and well-formed heart, apply 2-3 layers of paper mache, letting each layer dry completely before applying the next one. Drying may take several hours or overnight, depending on the humidity and thickness of the layers.
Step 6: Paint and Decorate
Once your paper mache heart is completely dry and firm, it’s time to decorate! Use acrylic or poster paint to color the heart in any style you like. You can paint it a solid color, add patterns, or even write a message. If you want to add a glossy finish, consider applying a layer of clear varnish after the paint has dried.
Step 7: Add String for Hanging (Optional)
If you want to hang your paper mache heart, attach a piece of string or ribbon to the top using glue or by threading it through a small hole in the cardboard. This step is optional but adds a charming touch if you plan to display your heart on a wall or door.
Step 8: Display or Gift Your Paper Mache Heart
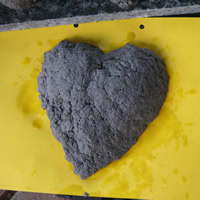
Your beautiful paper mache heart is now ready to be displayed! Hang it on a wall, place it on a shelf, or give it as a thoughtful handmade gift. It’s a lovely way to add a personal, eco-friendly touch to any space.


Additional Tips for Success:
- Personalizing Your Heart: Consider using patterned paper or magazine clippings for a more colorful, textured look. You can also add glitter, beads, or small embellishments to make the heart extra special.
- Eco-Friendly Tip: This project is a great way to recycle scrap paper and old newspapers. You can even use leftover cardboard from packaging to create the heart base.
- Sealing the Heart: If your paper mache heart will be placed in a humid environment, consider sealing it with a clear varnish to protect the paper from moisture.
This paper mache heart project is a fun and easy way to upcycle materials while creating a unique decorative piece. Perfect for holiday décor, Valentine’s Day, or just as a creative craft project, it’s a great example of how upcycling can be both practical and beautiful.