Milk Bottle Flower Heart
Upcycled Plastic Milk Bottle Flower Heart: Create a Charming Floral Decoration
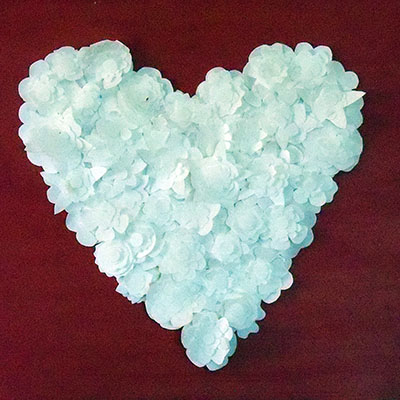
Transform empty plastic milk bottles into a beautiful flower heart that adds a splash of color to your home or garden. This upcycling project is a fun and creative way to repurpose plastic waste while crafting a stunning decorative piece. Perfect for gifts or personal décor, follow these steps to make your own flower heart!
Materials You’ll Need:
- Empty plastic milk bottles
- Scissors or craft knife
- Permanent marker
- Acrylic paint or spray paint (in various colors)
- Paintbrushes
- Wire (floral wire works well)
- Hot glue gun (optional)
- String or twine (for hanging)
- A heart-shaped template (optional)
Step-by-Step Guide:
Step 1: Prepare the Plastic Bottles
Start by cleaning your empty plastic milk bottles thoroughly to remove any labels and residue. Make sure they are completely dry before starting your project.
Step 2: Cut the Flowers from the Bottles
Using scissors or a craft knife, carefully cut the plastic milk bottles into flower shapes. You can create various sizes by cutting different sections from the bottles. For example:
- Cut the bottom of the bottle into a circular shape to form the flower petals.
- Create a layered effect by making larger petals for the base and smaller ones for the center.


Step 3: Paint the Flowers
Once you have cut out your flowers, it’s time to add color! Use acrylic or spray paint to paint each flower in vibrant colors. Allow the paint to dry completely before moving on to the next step. Consider using a variety of colors for a more lively display.
Step 4: Create the Heart Shape
If you want a heart-shaped decoration, you can use a template to trace the heart shape onto a piece of cardboard or thicker paper. Alternatively, you can freehand it if you’re comfortable. This will serve as the base for your flower heart.

Step 5: Attach the Flowers
Using a hot glue gun or wire, start attaching the painted plastic flowers to your heart-shaped base. Begin from the outer edge and work your way in, layering the flowers to create a full, three-dimensional look. Be creative with the arrangement, mixing different flower sizes and colors for visual interest.

Step 6: Add a Hanger (Optional)
If you plan to hang your flower heart, cut a piece of string or twine and attach it to the top of the heart using glue or by creating a small hole. Ensure the string is securely fastened to support the weight of the heart.
Step 7: Display Your Upcycled Flower Heart
Your upcycled plastic milk bottle flower heart is now complete! Hang it on a wall, door, or even place it on a table as a centerpiece. This colorful decoration is a unique way to showcase your creativity while being environmentally friendly.

Additional Tips for Success:
- Mixing Materials: Consider incorporating other recycled materials, like bottle caps or fabric scraps, to enhance your flower heart and add more texture.
- Seasonal Decor: Change the colors of the flowers based on the season or holiday to keep your decoration fresh and relevant. For example, use pastel colors for spring or warm hues for autumn.
- Gift Idea: This project makes a thoughtful gift! Personalize it by using the recipient’s favorite colors or flowers.
- Garden Decoration: If you want to use it outdoors, seal the painted flowers with a clear varnish to protect them from the elements.
This upcycled plastic milk bottle flower heart project is a delightful way to reduce plastic waste while creating a beautiful piece of art. It’s perfect for home decoration or gifting, showcasing the beauty of upcycling and creativity.