Mosaic love block
Upcycled Mosaic Love Block: Craft a Beautiful, Personalized Decor Piece
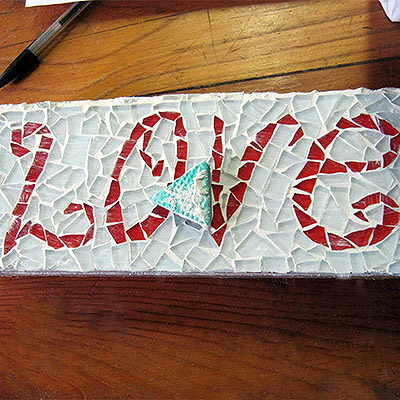
Create a unique, handmade “Love” block using upcycled wood and mosaic pieces. This project combines sustainability with creativity, turning old materials into a beautiful decorative item for your home or as a thoughtful gift.
Materials You’ll Need:
- Wooden block (you can use reclaimed wood or an old piece of furniture)
- Mosaic tiles, broken ceramics, or glass pieces
- Tile adhesive or strong glue
- Grout (optional, depending on the mosaic design)
- Sandpaper
- Paint or wood stain (optional)
- Pencil and ruler for lettering
- Paintbrush (if painting or staining)
- Sealer (optional)
Step-by-Step Guide:
Step 1: Prepare the Wooden Block
Start by sanding down your wooden block to smooth out any rough edges or surfaces. This will create a clean base for your mosaic and any paint or stain. If the wood is unfinished, you can choose to leave it natural for a rustic look or apply a coat of paint or stain to match your style.

Step 2: Design Your Mosaic
Decide where you’d like to place your mosaic pieces on the block. You can create patterns, spell out the word “Love,” or simply use the tiles to add texture and color. Use a pencil and ruler to mark out where each letter or pattern will go.


Step 3: Attach the Mosaic Pieces
Apply tile adhesive or strong glue to the areas where you’ll place the mosaic pieces. Start arranging the pieces on the block, pressing them gently into the adhesive. You can use pre-cut mosaic tiles or break old ceramics, plates, or glass to create your unique design.


Step 4: Grout the Mosaic (Optional)
If your design requires grout, apply it between the mosaic pieces once the adhesive has dried. Use a rubber grout float or your fingers to spread the grout evenly. Wipe away any excess with a damp sponge before it dries completely.


Step 5: Paint or Stain the Rest of the Block (Optional)
If you haven’t already painted or stained the wood, now’s the time to add color if you’d like. You can use bold colors to contrast with the mosaic or subtle tones to let the mosaic stand out. Let the paint dry thoroughly.
Step 6: Seal the Block
For a durable finish, apply a clear sealer over the entire block. This will protect the wood and the mosaic pieces, ensuring your Love block lasts for years to come.
Step 7: Display Your Love Block
Once everything is dry, your upcycled mosaic Love block is ready to be displayed! Place it on a shelf, mantle, or as part of a gallery wall to add a touch of handmade charm to your space.

Additional Tips for Success:
- Customize It: Feel free to change the wording to other words like “Home,” “Joy,” or names. You can also use different colors or patterns to suit your décor.
- Use Recycled Materials: Incorporate broken ceramics, glass, or even small stones into your mosaic design to keep the project eco-friendly and budget-conscious.
- Great for Gifting: This project makes a thoughtful, personal gift for loved ones. Create a special design tailored to their tastes and home décor.
This upcycled mosaic Love block project combines artistry and sustainability in a simple yet impactful way. Whether as a personalized decor piece or a heartfelt gift, it’s a wonderful reminder of the beauty that can be found in reclaimed materials.