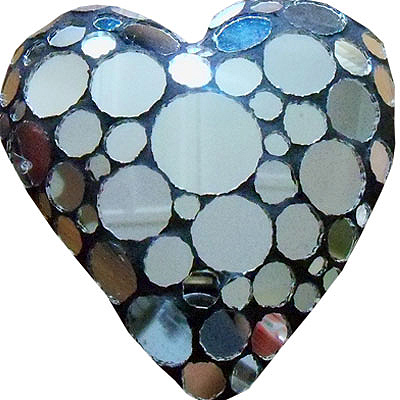
What you need to make a mosaic heart with mirror circles:
• Paper Mache heart, instructions here
• Mirror
• Glass cutter
• Two wheel tile cutter
• Tile breaker
• Permanent marker
• Cold glue
• A R2 or R5 coin
• Water
• Tile grout (we used dark grey)
• Mixing bowl
• Ice cream stick
• Sponge
• Old dry towel
• Plastic or latex gloves
The first thing you need to do for this project is to make a Paper Mache heart. This is an easy and fun project to do, though there is quite a lot of waiting. It's a good idea to make a whole bunch various Paper Mache shapes and forms, and then keep these for your various craft projects. If you haven't already, your first step before starting the mosaic is to make a Paper Mache heart, full step by step instructions can be found here "Paper Mache Heart".
Step 1
While you are waiting for your Paper Mache heart to dry, you can prepare your circular mirror mosaic pieces. You can create these circular mirror pieces very easily. First, use your glass cutter to draw lines of even width across your mirror sheet. As you draw the lines, you need to make sure that the glass cutter is actually scratching the mirror; you should hear quite a loud zipping noise as you draw the lines.
It is very important that you keep the tip or blade of the glass cutter well lubricated. You can use any machine oil for this, such as sewing machine oil, or even motor oil from when you top up the oil in your car.

Step 2
Use your tile breakers to snap the strips of glass off, so that you are left with several strips of mirror. What you need to do is place the bottom, middle bit of the breaker along the scratch line on your mirror, and then squeeze it to break the mirror.

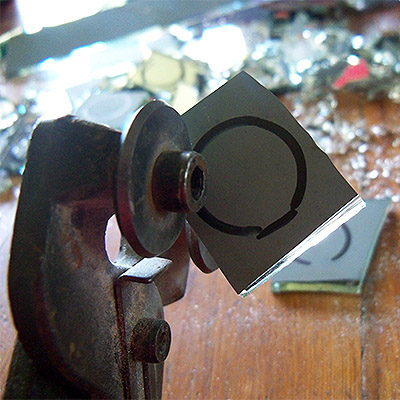
Step 3
On your strips of mirror, you need to trace the shape of the coin onto the back of the mirror. Use your marker and R2 or R5 coin. Keep going along the length of each strip of mirror, creating circles with your marker and coins.

Step 4
Once you have traced your circles onto the mirror strips, use your two wheel tile cutter to cut between the circles, creating mirror squares with a circle traced on the back.

Step 5
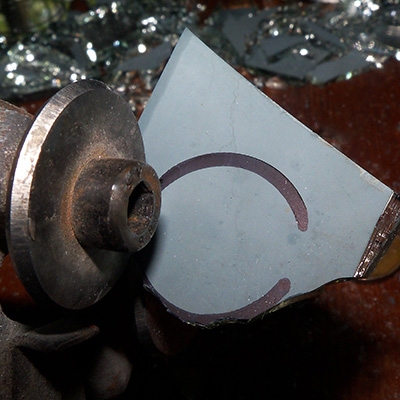
With all of your square bits of mirror and circles traced onto the back, you can start trimming the squares down to the circular shape.
Use your two wheel tile cutter to work your way around the traced mirror circle, carefully trimming off the excess mirror to form the mirror circles. You need to work quite carefully, gently nipping away at the edge using the two wheel cutter.
Step 6
Continue to trim all the mirror squares so that you have only mirror circles left. Vary the size of the circular mirror pieces by trimming within the trace line, for varying smaller mirror circles. This will add texture and depth to the finished mosaic Paper Mache heart.

Step 7
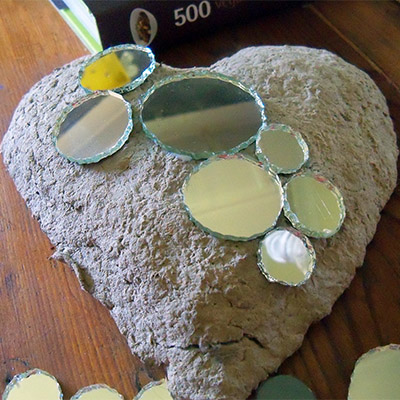
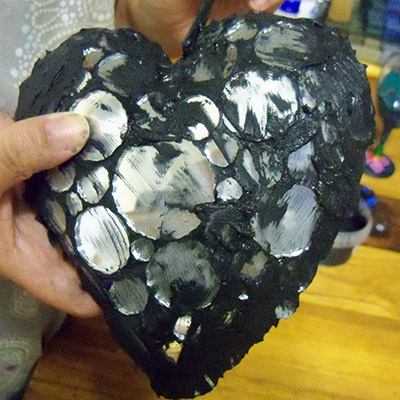
Now we can begin attaching the circular mirror mosaic pieces to the Paper Mache heart. Working from the centre of the Paper Mache heart out, expel a dollop of cold glue onto the heart and place a circular mirror piece down.


Step 8
Continue to apply cold glue to the Paper Mache heart and place your mirror circles onto the glue. Work from the centre out, using your varied size mirror mosaic circles.
Step 9
Like any mosaic, you will need to puzzle piece your mirror circles onto your heart, to ensure that the majority of the heart surface is covered and that the pieces fit nicely together. If you find that you do not have any pre-prepared mirror circles that will fit, use your wheel tile cutters as you go, to trim the circles down for a better fit.

Step 10
With all mirror mosaic circles glued down onto the Paper Mache heart, allow to dry, preferably overnight.
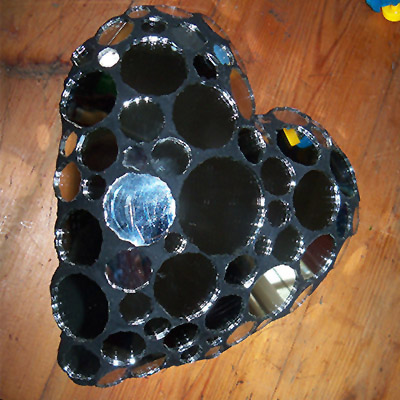
Step 11
Place your grout in the mixing bowl. If you are using white grout and want to darken it, as we have done, simply add black oxide powder to the grout. This is available at hardware stores. Keep adding black oxide powder until you are happy with the shade.
Step 12
Mix water into your grout, and stir using the ice cream stick. Grout goes from being too thick to too runny very quickly, so add just a little water at a time and mix to check the consistency. Remember to also crush any lumps and scrape the sides of the container to make sure it is all thoroughly mixed.
Grout is at the correct consistency when it is a little softer than toothpaste, or about the same consistency as mayonnaise.
Step 13
Apply the grout to the heart using your ice-cream stick, and then spread it around using an old credit card, hard piece of foam, polystyrene or even card. Make sure to work the grout into all the cracks, ensuring that all crevices are filled. We have used a dark grey grout because it complements the mirror wonderfully.


Step 14
Again, using your foam, old credit card or piece of foam, gently scrape the surface to remove excess grout. Now use a soft sponge to further remove excess grout and leave to dry thoroughly.
Step 15
Once completely dry, you can use a damp cloth and or sponge to clean the remaining grout from the mirror surfaces. Dry again and then use a dry cloth to dry polish the item and bring up a shine!