What you will need:
3x pieces of masonite, superwood or chipboard, sizing optional
3x Paintbrushes, small, medium & large
Carbon paper, enough to cover your boards
Print out of your wording
Acrylic paint (we used white & green)
Fine grit sandpaper
Exterior varnish (resin based as opposed to urethane based)
Craft knife
Scissors
Sellotape
Working surface
This is fantastic way for you to create something unique and upcycled for your garden! You will be trying your hand at painting, or even practicing or refining your paint techniques during this great recycled craft project.
Step 1
We have used left over pieces of masonite and chipboard to create this project. If you have any spare flat pieces of wood, masonite or chipboard lying around in the garage please use these!
Our boards ranged in size between 470mm and 330mm by 170mm in size.

Step 2
Now we need to paint each board. We have painted two of our boards off-white, and one green, but you can obviously use any colours you like. Use the largest brush of the three, to spread an even thin coat over the top and sides of the board. Allow this to dry before painting the underside.


Step 3
You may find that, depending on your selected colours, you will need a second and sometimes even third coat of paint for a nice even finish, so if you need to, add another coat until you have a good, solid finish. We suggest at least two coats anyway. After the first coat, you should use a small, very fine, piece of sand paper to smooth out any lumps and bumps after painting. Then paint again with the second coat.


Step 4
With the boards evenly painted to a superb finish, you are now ready to mark out your chosen text! We have chosen the words 'Thank you', Beautiful' and 'Hope' for our three boards. What you should do is create a word document with your chosen words in the desired font, and then print these out large enough for your boards. If the prints out are larger than one A4, use sellotape to attach them to each other, creating a larger sheet, where the words appear whole. This will simplify your transfer/copying process.


Step 5
Now we need to transfer or copy the lettering (words) onto our boards. Place your first board face up on your working surface. Place a sheet of carbon paper down onto the board. Again, as in Step 4, if you require more than one sheet of carbon paper, use sellotape to create a large enough sheet. Over the carbon paper, place your printed words. You will need to feel your way through the paper and carbon paper, to the centre of the board, for final positioning of the lettering.


Step 6
Once the carbon paper and your print out are both in place, use a pen or pencil to trace the outline of the lettering. While tracing your letting, use an even pressure to maintain a clear transfer.

Step 7
When complete, remove the paper and carbon paper to reveal your letting transfer on the board.

Step 8
Continue as above for your other boards. First by placing the carbon paper onto the masonite board, placing the print out on top, and then tracing the lettering onto the board.


Step 9
Now we can start painting!
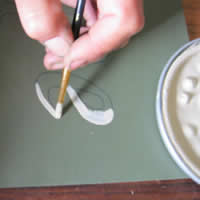
We have used off-white on the green board, and green on the white boards. You can use any colours you like, but we strongly suggest you use complimentary colours for the biggest impact. You want to use the smallest brush for this work as it will put your steady hand to practice and you want to get very fine detail.

Step 10
It is a good idea to use the end of the largest brush to lift your hand off from the board while you paint.
It is also a good idea to work away from the area you are painting to prevent smudging, so if you are left handed, work from right to left (as in the picture below), and if you are right handed, work from left to right.


Step 11
With your lettering painted on, allow to dry and then come back to add decorations to the background of your board. We have used a simple leaf / flower free hand design to decorate our masonite boards.


Step 12
With all of your boards now painted with lettering and decoration, you will need to clear coat each one to protect it from the elements.
You should use an exterior varnish, preferably a resin based varnish as opposed to a urethane based varnish as it is far less likely to discolour over time. Use a large brush to evenly coat all sides of the board. You will not need to sand after each layer and re-apply. One or two coats will do, but be sure to allow the first coat to dry properly before applying the second coat.

Step 13
Well done! You have completed your project!


